

|
This section contains the following topics: Install the Data Provider into the Toolbox |
|
|
|
The following software is required to connect to Ingres from .NET:
Note: The procedure in this guide shows how to connect using Visual Studio.
|
|
|
The Ingres .NET Data Provider is integrated with Visual Studio 2005. Such integration allows a programmer to drag-and-drop the data provider design component onto a control, and to easily develop applications using wizards and editors.
The Ingres .NET Data Provider must be installed into the Visual Studio 2005 Toolbox before using it for the first time.
To install the data provider components into the Toolbox
The Customize Toolbox dialog is displayed.
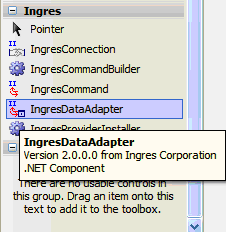
The Ingres .NET Data Provider components are installed in the Toolbox, as shown in this example:
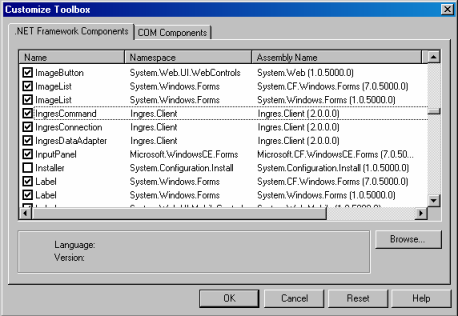
If the IngresCommand, IngresConnection, and IngresDataAdaper components do not appear in the Customize Toolbox dialog, you can add them.
To add the Ingres .NET Data Provider components to the Customize Toolbox dialog
The components are added.
|
|
|
The Toolbox's Data tab lists the .NET data provider components that are available during the application's design.
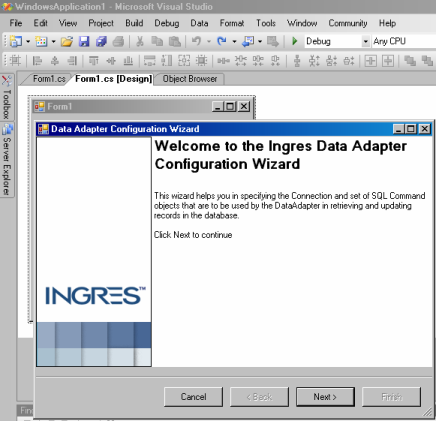
To start the Ingres Data Adapter Configuration Wizard
An "ingresDataAdapter1" component and its icon are added to the Visual Studio 2005 designer component tray.
The welcome page of the Data Adapter Configuration Wizard is displayed.
|
|
|
You must configure a connection string before connecting to a database using a .NET application.
Ingres Data Adapter Configuration Wizard assists you in specifying the design properties of the ingresDataAdapter1 component, including its connection string definition.
To define a connection string
The Connection String Editor dialog is displayed.
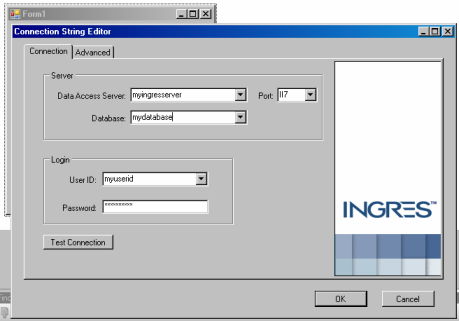
Specifies the name of the Data Access Server (DAS) that services .NET application requests for the target DBMS Server.
In this example, we use the local node, which uses the reserved name "(local)".
Identifies the port number on the host server machine that the Data Access Server is listening to.
The port is typically specified as abn where ab is the instance ID (set during installation and found in the Ingres system variable II_INSTALLATION) and n is 7 for the DAS.
(To display the instance ID, use the command ingprenv II_INSTALLATION.)
Default: II7
Specifies the name of the target database that the application will connect to by default.
Specifies the name of the authorized user that is connecting to the DBMS Server.
Note: User ID and password are optional when connecting to a local Data Access Server and the current operating system logged-in user is also a valid Ingres user.
Specifies the password associated with the specified User ID for connecting to the DBMS Server.
Click Ok.
The wizard generates a connection string using the information you supplied. For example:
Host=(local);Port=II7;Database=demodb
|
|
|
In the Data Adapter Configuration Wizard, you can enter your SQL command or use the Query Builder tool to generate the SELECT statement.
To design a query using the Query Builder
The Add Table dialog opens.
A list of available tables is displayed.
Ingres Query Designer opens.
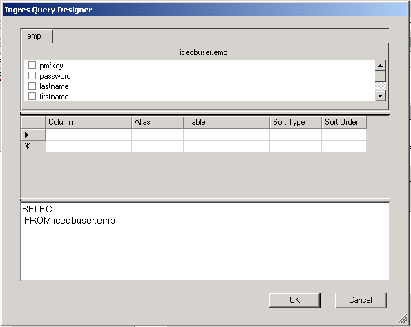
The Ingres Query Designer has three horizontal panels:
Consists of tab pages, one for each table reference in the FROM clause of the query. Each tab page contains a list of check boxes for each column defined in the table. The columns are listed as they are written in the table's catalog definition.
Check or uncheck each column to add or remove the column reference from the SELECT statement.
Is a grid that lists the column names and or expressions in the SELECT statement's column reference list. It provides a convenient tabular format for entering the column references.
Displays the query text as it is being built. The query text can be directly edited and is automatically formatted for readability.
The other two panels are automatically updated.
The query builder returns to the Ingres Data Adapter Wizard and displays the generated SELECT statement.
The Ingres Data Adapter Wizard is closed.